Better Low-End in Mixes
Getting tight and rock-solid low-end has become a must for any mix engineer that works with most modern genres of music. Countless plugins are claiming to feature the low-end magic button that you’ve been waiting for and dozens of tutorials showing the “secret tricks” on nailing that part of your mixes, yet they rarely seem to work.
The one factor determining whether a mix has good low-end or not is whether or not the mixing engineer can hear accurate low-end reproduction in their mix environment. Sorting one’s studio acoustics can have a far more significant impact on low-end heavy mixes than any piece of software. The truth is that if we can make guitars & vocals sound tight and crisp – surely we can do it with the bass and kick, and we don’t need yet another “trick.” That is if we can hear the kick and bass.
In this article, we’ll explore what you can do to get a better low-end response on a tight budget out of your existing system in a small to a medium studio, which includes home studios, bedrooms, sheds, garages, and everything in between.
Understanding Acoustics
Acoustics is a very complex topic that very few understand. We recently had one of the greatest acousticians in the UK visit The Friary Studios to tune our main monitors – Nick Whitaker. This person has designed and fixed the acoustics of more studios than I’ve been in, and I truly trust his expertise. While tuning our speakers, we bombarded him with questions, the answers of which I will share in this article.
Nick told us that, sadly, no matter what degree an acoustician has, much of their work comes down to guessing and hoping for the best. He told us that most acousticians would come to a room with their fancy equipment, do some measurements, mainly for show, and then advise based on common sense and standard practices. Now, I’m not saying they are fraudsters. Quite the opposite – they are incredibly talented people, that often have to rely on their ears alone and use measurement tools to make you feel safer.
Sure, there is science in acoustics. It all relies upon solid math and good measurements. Somehow, though countless high-end studios feature 6-figure investments in acoustic treatment, their results end up less than pleasing. That is why Mr. Whitaker has been so busy traveling to high-end studios and fixing their acoustic nightmares.
The reason I’m sharing this with you is not to discourage you, but quite the opposite. If so many educated and experienced acousticians are following solid principles when designing studios – that means you and I can do the same.
In this article, I will speak with simple language and not dive too deep into the science as I want the everyday mixer who does not understand acoustics very well to get a simple guide with things that work and things that don’t.
What Works and What Doesn’t
The Sound System
Picking the right monitor system for you and getting the most out of it is a crucial step. As we all know, music is incredibly subjective, and so is the way we perceive it. We can argue all day on what speaker is “flat” and what isn’t, but the one thing we can not argue over is the limitations of a given system. Regardless of what speakers you choose – they will have their limits. If you want thick low-end, you need bigger speakers that are capable of it. A simple low- end bump in your Sonarworks Reference 4 coupled with tiny small monitors won’t do the trick.
Here are some facts Nick Whitaker shared with us. Speaker design is incredibly complex, and very few companies can do it right. Purely from a design perspective – smaller speakers are easier to make and often have fewer “mistakes” in their construction, which makes them more trustworthy. Yes, they often have less low-end capabilities, but that can be compensated for with a simple subwoofer.
Subwoofers are another controversial topic. You either hate them, or you love them. One thing is for sure: the myth that smaller rooms can’t feature subwoofers is false! Small rooms are harder to treat, but they may benefit even more from a well-placed subwoofer than larger rooms. Often times it’s best to over-absorb the low-end in small rooms and then use subwoofers to bring it back to life.
Tip: Get a subwoofer that can produce lower frequencies than your main monitors. I know I’m stating the obvious here, but I can tell you how many people I’ve seen using small subwoofers that aren’t much more powerful than their main monitors. That is simply pointless.
Speaker placement – incredibly important! Yes, in small rooms, you should position yourself facing the shorter wall, but what’s more important is how far the speakers sit from that wall. There is a common misconception that you should leave an X-amount of airspace between the speakers and the back wall. In small rooms, that is completely false when it comes to low- end.
If your speakers are front-ported, you should place them as close to the wall as humanly possible (without them touching the wall)! Low-end does not come out of the speakers in a cardioid pattern but in an omnidirectional (spherical) way. The further the speakers are from the back wall – the longer the delay of the reflected low-end and the more out-of-phase lows you’ll get at the listening position.
Padded speaker stands – NOT a must! Some speakers (like the renowned NS10) are designed as bookshelf speakers and have better low-end when placed on solid wooden stands that resonate and transmit low-end to the floor or the meeter-bridge of a console. To determine whether your speakers fall into that bracket, do not read their manual as the company that designed them may not have included this information. Just get a pair of solid stands and try it for yourself. You might prefer the low-end.
The Room
The worst choice for a mix-room is a small bedroom in a flat. Today we’ll be exploring how to make that scenario work. If you can deal with this – you’ll be able to get a good sound in a bigger room as the principles remain the same. By now, hopefully, you’ve read a few articles on this topic, and you understand that if you can hear deep low-end – your neighbors can too. That is unavoidable in a studio situated in a flat unless we dive into sound-proofing, but that is a whole different beast that we won’t be going in today.
If you happen to be on the market for a new flat, you can look for one on the ground floor of a building with a bedroom with minimal connecting walls to your neighbors. Room dimensions are essential. But rather than boring you with numbers, I’d advise you to avoid square rooms at all costs.
Diffusion, Trapping, or some other voodoo?
Before you think of investing in shiny good-looking wooden diffusers, you may need to sort out your low-end. If you plan to deal with the low-end issues using diffusers, let me share some numbers with you. To treat the frequency spectrum between 30Hz and 300Hz, you need a depth of the diffuser equal to 573.33 cm (225.72 inches) for a standard quadratic diffuser, which will significantly decrease the space in your room. If your room is small, you’ll inevitably end up sitting too close to this monstrous construction, and after about 20min of listening to music, you’ll want to scream in a bathroom towel. Oh yes, and for a 600x600mm panel, you’ll need about 421 meters of wood.
Diffusers can add to a room and have their purposes, but they should be designed for the higher regions of the frequency spectrum in a small space.
If not low-end diffusion, then we are left with absorption. The goal of treating room-acoustics with absorbing panels is to slow down reflections from walls, dampen as much of the sound as possible, minimize resonances, and break up the boring straight walls by adding some new corners and angles.
Tip: Placing an absorbent panel away from the wall can double its effectiveness by allowing the panel to absorb lower frequencies. Leaving an air gap between the panel and wall allows for sound to bounce back from the wall and into the rear side, giving you a second round of absorption. A good rule of thumb is to leave a gap as deep as the depth of the panel itself. A 10cm panel placed 10cm away from the wall will have the same effectiveness as a 20cm panel stuck to the wall. Be mindful not to increase the air gap higher than the core material of the panel as the panel will lose its effectiveness in the lower mids.
Where to treat
People often refer to corners are a place where bass gathers or builds-up . Whilst they aren’t far from the truth I’d like to refer to corners as a place where the bass is easily gathered (absorbed) with the appropriate bass trap.
You see, sound travels through the air much like water. Imagine hosing down a wall. As the water splashed in the surface some will come back at you and some will disperse to the sides. If 2 walls are being hosed down simultaneously then the dispersion of water will naturally accumulate where the 2 walls meet (the corners) and that would be a good spot for you to soak it up with a sponge (bass-trap).
Lucky for us, a room with 4 walls has 12 corers where we can sponge out the excess of low- end. When trying to decide how many of those 12 corners you’ll need to treat I’d say – as many as possible. If money and space is an issue a minimum of one third (4 corners) is a good place to start. Those 4 don’t necessarily have to be the 4 standing corners where the side-walls meet. If you had to pick only 4 out of 12 I would recommend to definitely include the corner above you in that number. That is the corner where the wall you’re facing meets the ceiling. It’s treatment could be part of a larger cloud (panel treating the ceiling), but we’ll get to that later.
After we’ve dealt with the corners here come the first reflection points to your sides and above your head. Many people choose shallow panels in those spots, but in my opinion they are just as important as the corners. If you’re working on a tight budget I’d recommend doubling up on the panel thickness above your head before the sides. I can’t go into the depths of why that is, but in my experience I’ve aways gotten better low-end response with a thick cloud rather than thick side-panels.
Choosing The Right Bass Trap Material
If you’re in a bedroom, you have two choices for the bed – either throw it away or put it in a different room. Mattresses are not good bass traps. Despite what you read on the internet – mattresses don’t work. They absorb a limited portion of the frequency spectrum, and their size to performance ratio is poor.
If you’re thinking of investing in foam-made panels – give this idea up too. The foam may look good but is incredibly ineffective and often does more damage than good. It absorbs mainly high-mids and highs, and overdoing it can make a room sound dreadful. I’m honestly shocked when I see YouTubers giving “professional advice” when they sit in rooms covered with foam panels from top to bottom. In my experience, this is a major red flag, and one should seriously consider trusting such influencers’ opinions.
Rock-wool, rock-wool, rock-wool… or fibreglass. That is what you need. These materials are not expensive and are readily available. The two most effective rock-wool-based bass traps are open-back panels (for treating velocity) and closed-back pressure absorbers (for treating resonances). Many would argue that the latter is the only “true” way to treat low-end issues in a room, but that option is often unpractical in smaller spaces. Resonance absorbers can take up a lot of space and are much more complex to build and tune accurately. For that reason, most small to medium rooms should rely on the good old open-back panels.
Tip: Hard-floors work wonders in mixing rooms. If you have one and you are planning on installing a cloud above you don’t cover the floor with carpets! The absorption of the cloud coupled with the high-end absorption of the carpet will create a feeling of being in a much smaller room than the one you’re in. When dealing with low-end issues in small room we often have to over-dampen the room with absorbent material. Having an exposed hard floor can nicely counteract this.
Open-back Bass Traps on a budget
The trick with open-back panels for bass trapping is to use light pores materials and not be conservative with their depth. The deeper – the better!
Ready-made bass traps from rock-wool can be pretty expensive, considering the sheer number of them you’ll need, but building them yourself is probably easier than you might think it is. The most challenging step is putting together the frame that holds that nasty itchy pores material. This step can also significantly add to your cost both with money and time for building. Luckily there is a simple solution for those of us working on a budget – used IKEA bookshelves (or any other brand). I suggest IKEA because their cheaper furniture does not seem to hold its value and can be purchased very reasonably second-hand.
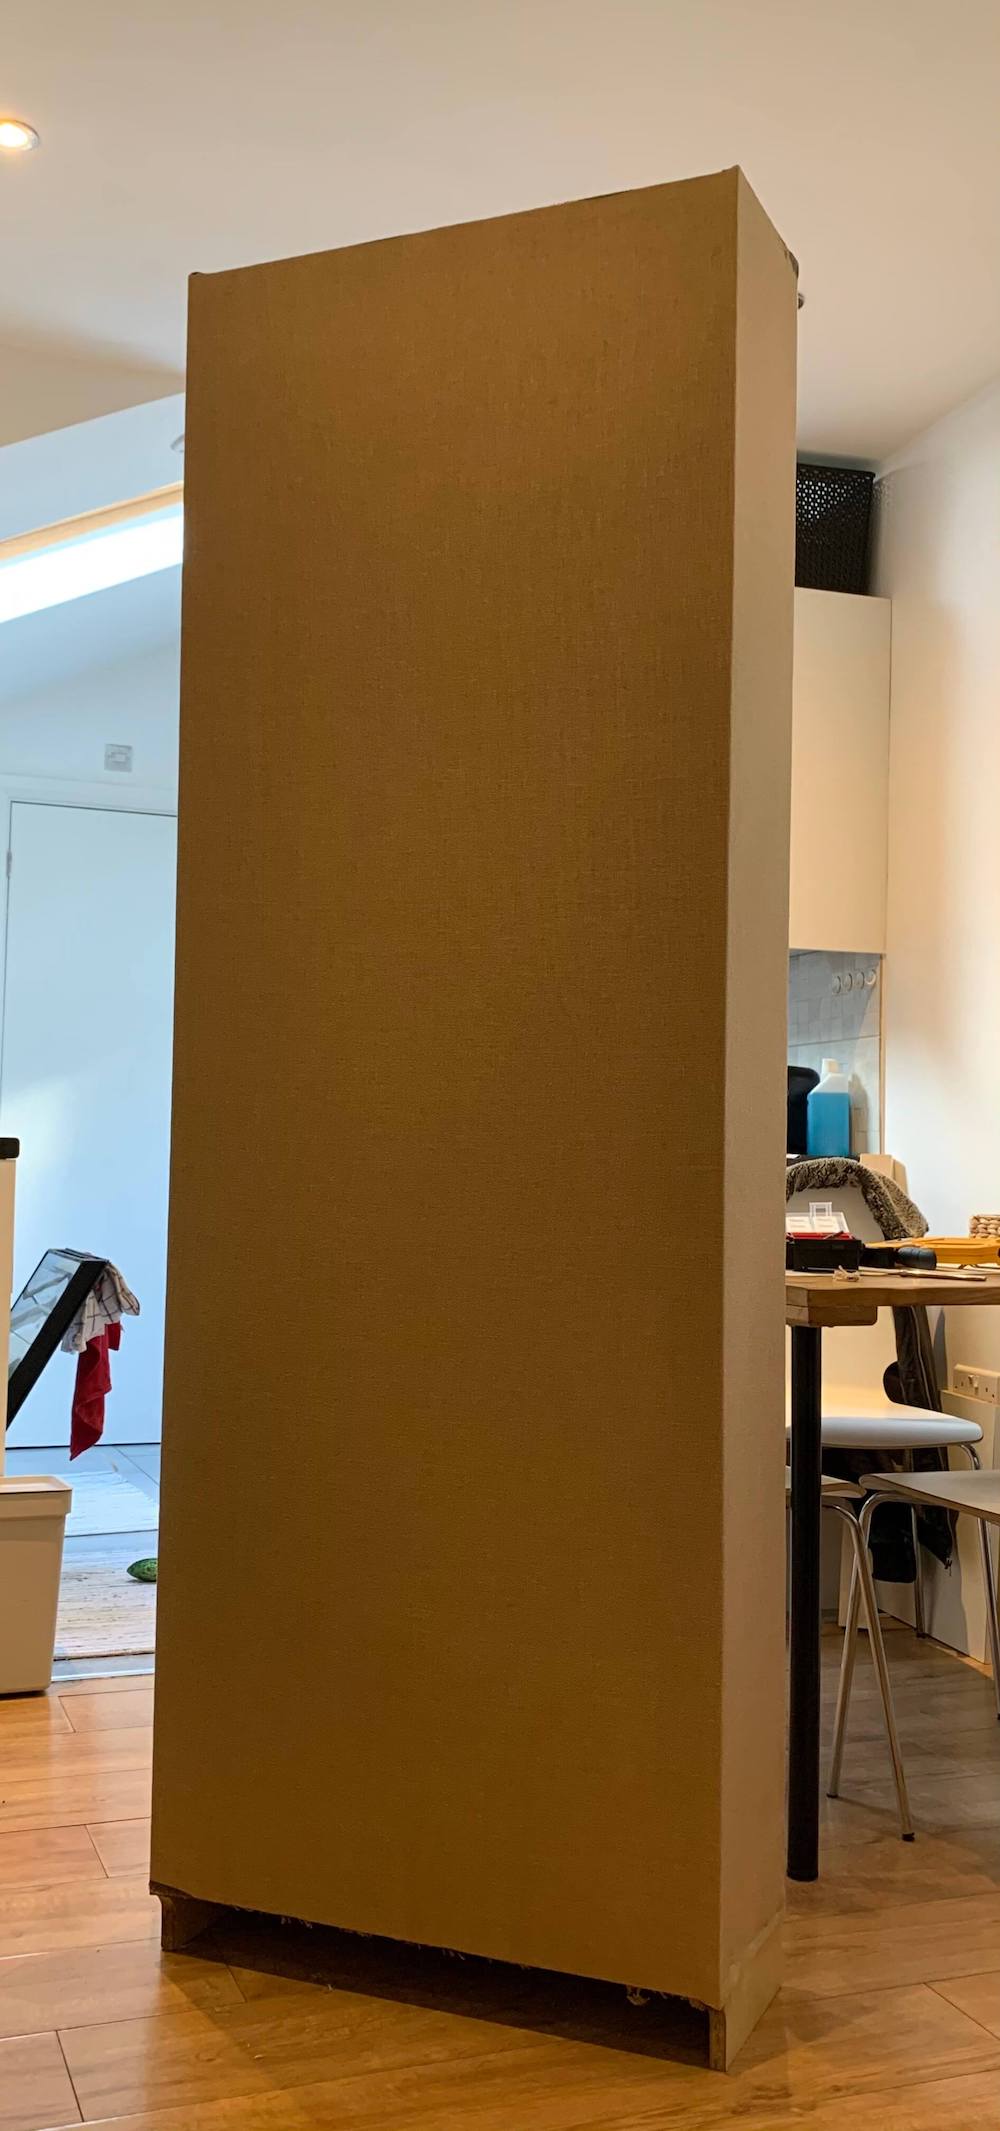
Bookshelves make great frames for bass traps. They are inexpensive when bought used and can save you a lot of hassle. I recently built two monster bass-traps (2×0.67×0.3 meters each) from used IKEA bookshelves, which I found in the Facebook marketplace for 10£ each (14$). They not only had the exact height, width, and depth I needed but also came with a super handy thin backboard. Later on, I’ll explain its uses.
If you happen to be building your frames or you’re in the market for used bookshelves, here are the basic principles for their dimensions. The coverage of a given bass trap needs to be equal to most of the area you’re targeting with that specific panel. Corner bass-traps should stretch from floor to ceiling, and if not – they should cover at least two-thirds of the room height. Respectfully back-wall bass traps should cover at least two-thirds of your back-wall. These are very rough estimates.
Remember! The way acoustic treatment works is that you need MORE! A single diffuser on your back wall will not make any noticeable difference if you’re only covering 5% of the surface area. Whether you are trying to absorb or diffuse sound, you need to cover most of the surface area of the wall or corners you are treating to notice any difference in sound!
The depth of bass traps is of utmost importance. The higher the depth – the lower the frequencies the trap will absorb. The minimum depth I’d recommend you need to look for is 8-9 inches (25cm). Although many consider 6- or even 4-inch panels as bass traps, I want to show you a comparison of the Absorption Coefficient of 4-inch and 9-10 inch rock-wool panels.
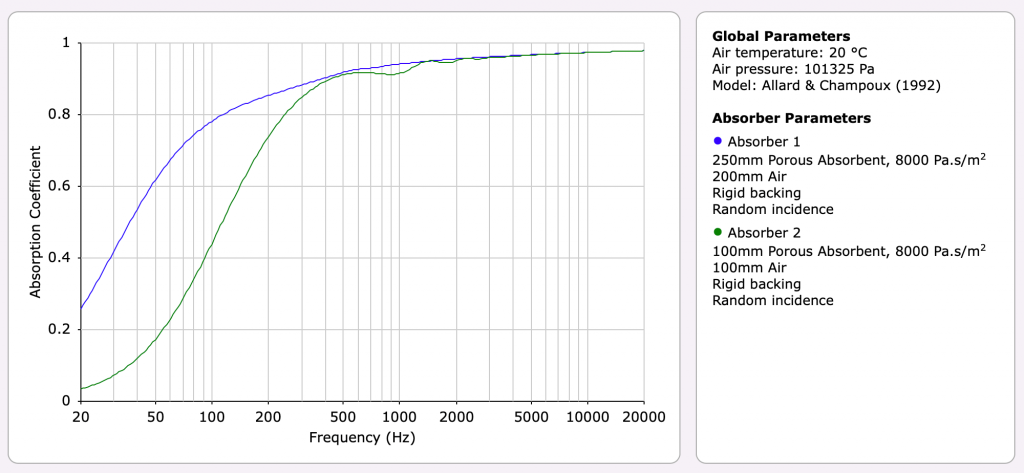
That graph indicates that at 100Hz, the 4-inch panel has already lost 60% of its effectiveness. Respectfully at 50Hz, it has lost around 80% of its effectiveness.
One final note on building your panels – the fabric! The safest bet is to look for Acoustic Fabric, otherwise known as Speaker Fabric. Its function is to not only make your panels look pretty but also stop the rock-wool fibers floating in the air and getting in your lungs. It allows for free-flowing air, minimizes reflections, and contains the material escaping into the air. If you can’t get hold of this fabric, which can be pricey – use any fabric through which you can breathe freely when stretched across your mouth.
Tip: To decrease the air-flow resistance, stretch the fabric to the best of your abilities. Imagine a snare drum with its skin stretched across the rim. The fabric should have no wrinkles whatsoever to indicate decent stretching.
Treating Ceilings
Like I said earlier – treating ceilings can be channeling as you not only have to build/purchase bass traps, but you have to find a clever way to mount them on the ceiling above you. Most people drill their ceilings and suspend their panels with chains or ropes, but that may not be the best option for you.
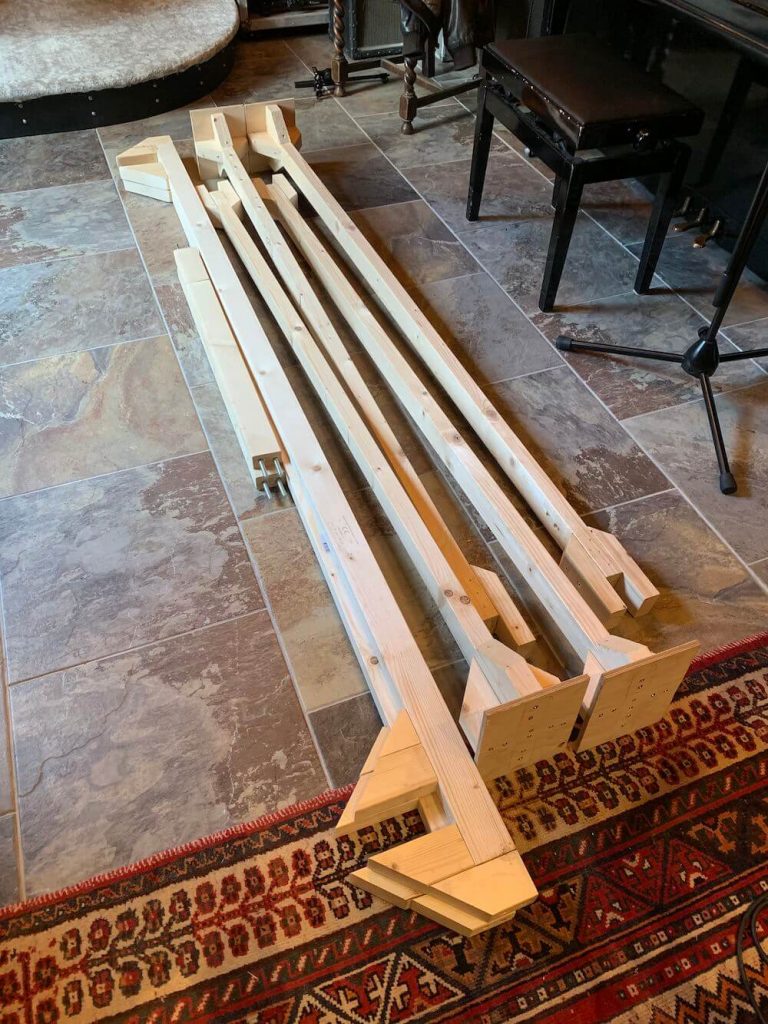
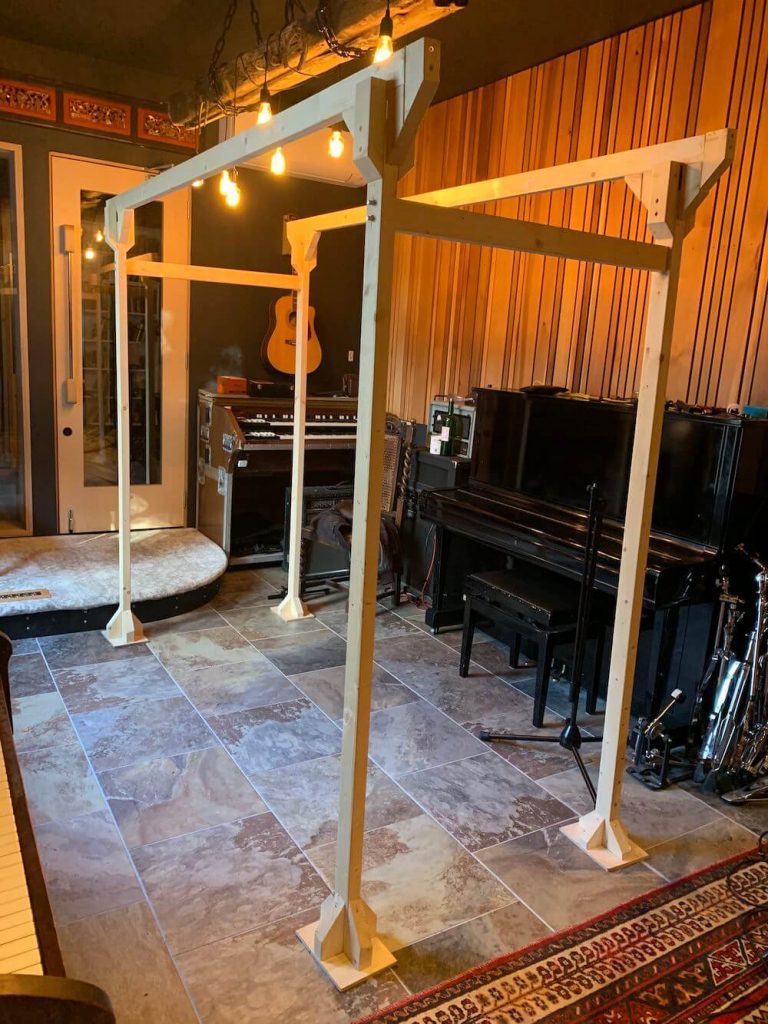
I have moved to 4 different locations over the past ten years as I’m renting rather than owning. To avoid damaging the ceilings in those rooms, I had to come up with an elegant solution, which would support my cloud and be dismountable and transportable.
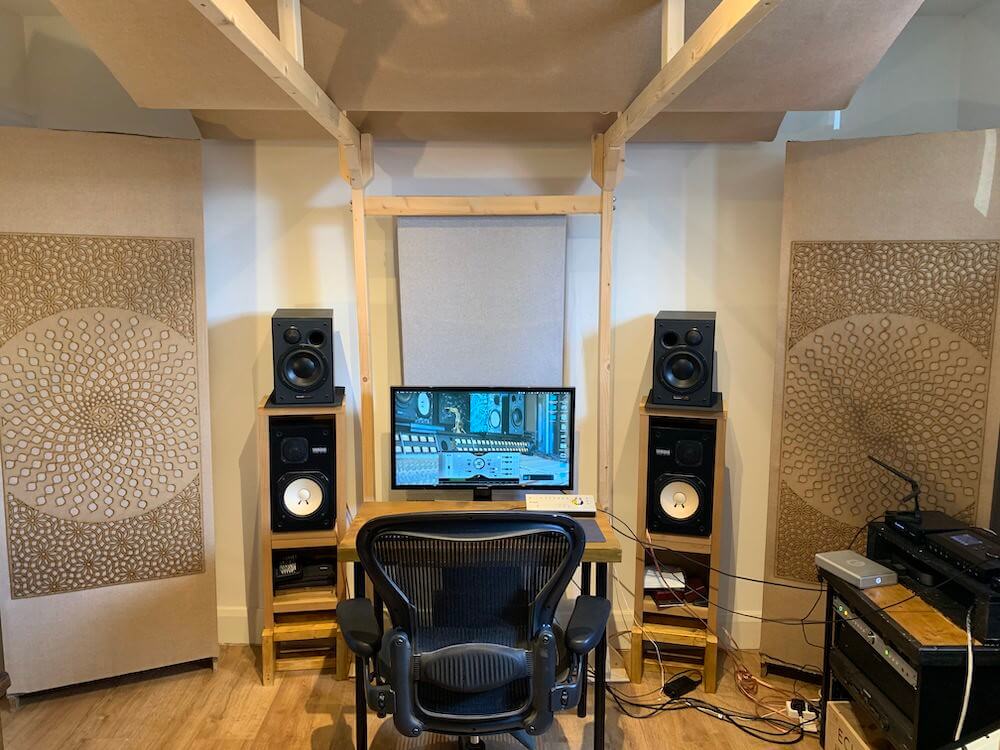
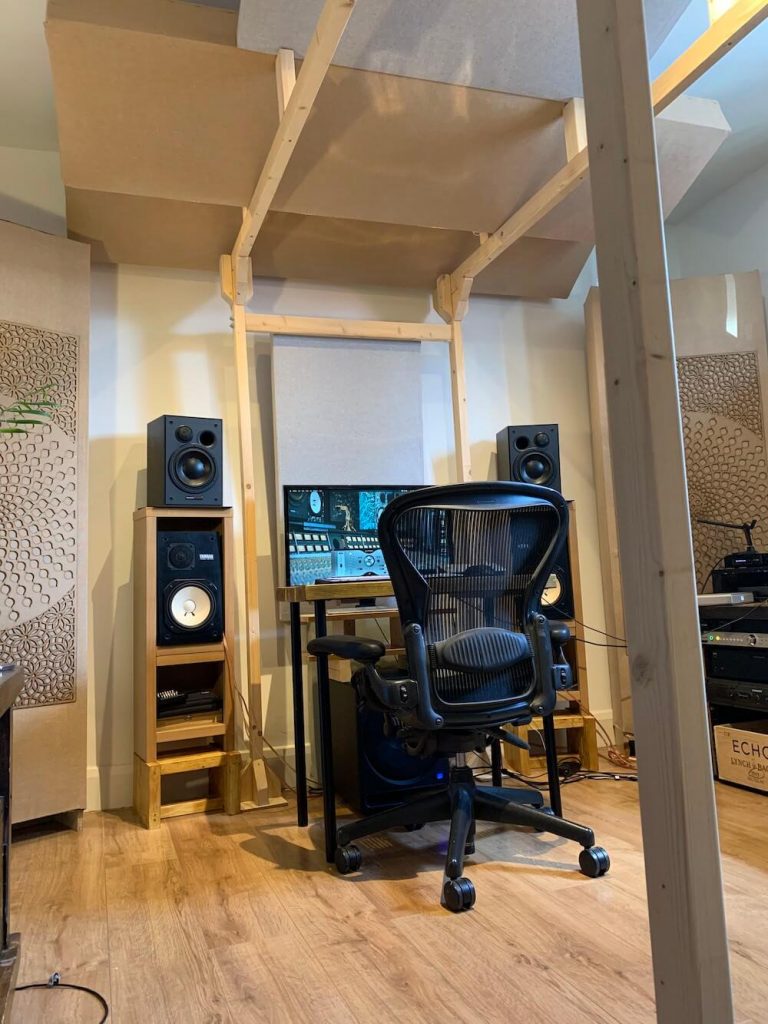
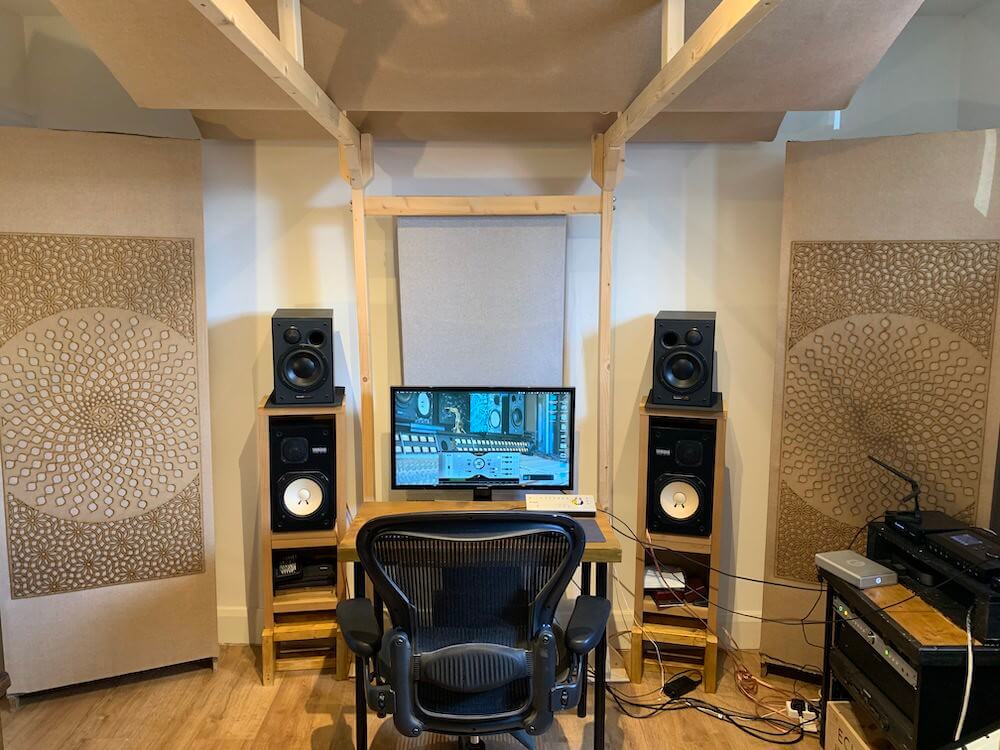
It is a basic wooden structure, which I call “The Arc.” It consists of four wooden vertical beams (legs) and four horizontal ones joining the legs and supporting the panels above you. My design included some clever joints that allow me to dismantle the thing in a matter of seconds and transport it to a different location when moving house.
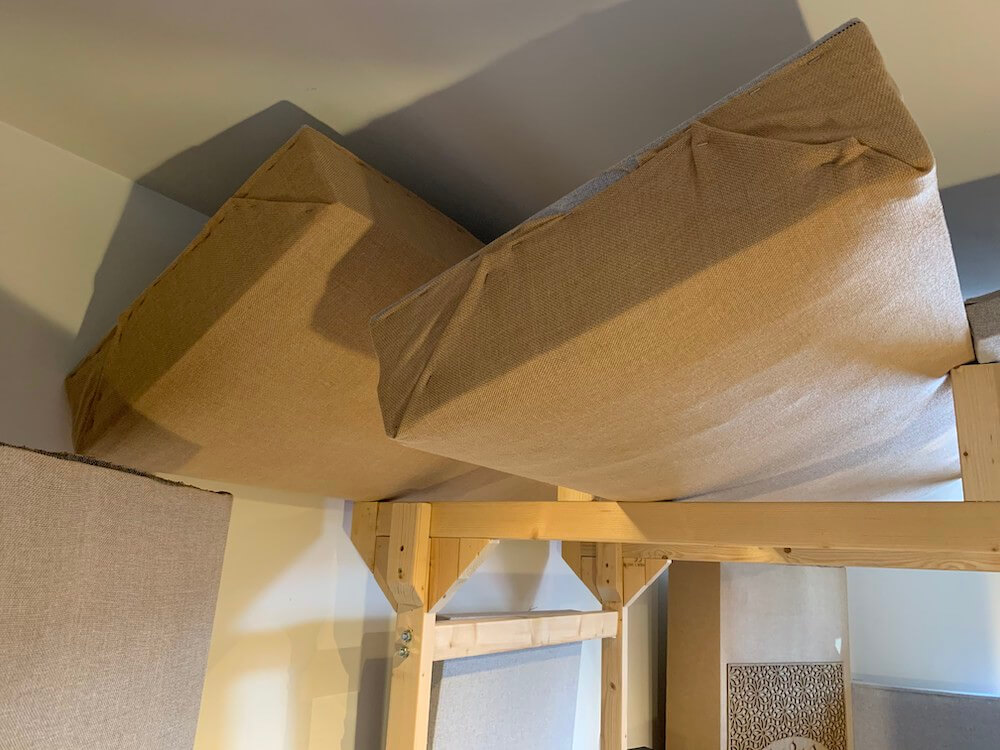
When placing the bass traps across the top 2 horizontal beams, you can either leave them flat (parallel to the floor) or angle them at 45 degrees. In my personal experience, placing them at an angle makes a significant difference to the sound as it created more air space between the listener and panels. Placing them flat can leave them too close to your ears, which will interns make the room feel smaller or plain dead.
Another considerable benefit of placing them at an angle is that you can use the panel closest to the wall you’re facing as a corner bass trap. Remember that critical corner I mentioned earlier when we spoke about picking your corners? That’s an elegant way to treat it without drilling any of the walls or ceiling.
Bringing life back to your room
When treating any room, you can’t have too much treatment. There is no such thing as long as you decrease the reverb time of all frequencies reasonably equally. However, when treating a small room, you’re often forced to use so much absorbent material to get the low-end under control that there are few reflective surfaces left, which intern can make your room sound dead, unpleasant, and unusable. A simple solution would be to create some new reflections, but in a diffusive way, so that they scatter across the room and don’t interfere with your work.
Absorbing panels can have a lining of thin perforated wooden boards or wooden strips. That would create a level of liveliness without interfering with your listening experience. As all things mentioned in this article, overdoing can also have a damaging effect on your music, do it with caution.
A good spot for those diffusive wooden panels is in front of the corner bass traps you’re facing, as their angle will point any reflections away from the listening spot.
When choosing how to perforate the thin wooden diffuser panels, you should know that science is behind this. Calculators can determine the exact dimension of holes and their positioning depending on how you want the panels to perform. However, if you cannot do the calculations or drill with precision, you can use common sense and do something rough. That will still work better than no diffusion at all.
Tip: Remember earlier when I mentioned that second-hand bookshelves often come with a thin backboard? Well, that backboard can be drilled and used as a diffuser panel. It may not look great, but if you’re working on a tight budget, that might be the solution you need!
Here is an example of what I did with a pair of corner bass traps: I found laser-cut 3mm MDF panels on eBay, which happen to have reasonable dimensions and a generous amount of various-sized holes. I’m sure the pattern of the holes may not be “correct” if we asked those diffuser calculators, but they do the job just fine, and they look great, in my opinion. If you’re wondering what to type in the search engine – start with “Wooden radiator cover panels.”
Room Correction Software
Now, that is one topic that holds a lot of controversies. Almost every professional acoustician whose opinion I’ve asked for has advised me to stay away from room-correction software except for the ridiculously priced Trinov System ($7,000). Yet, there are plenty of well- recognized and successful mixing engineers that would beg the difference as they continue to make good-sounding mixes using Sonarworks Reference 4.
As a person who has been: battling with small rooms, worked in professional high-end studios, spoken with numerous acousticians, producers, mixers, and everything in between – here are my 2 cents on the matter: Room-correction software is the equivalent of trying to treat a gunshot wound with a tiny plaster. If you’ve been shot in the stomach with a shotgun, a plaster won’t stop the bleeding. However, you’ve taken out the bullet, have been stitched and bandaged, the plaster may do enough to hold the bandages together.
Let me explain what I mean by that. If you expect to install the “Reference 4” in a poorly treated room with a poor sound system and get good results, it won’t work. If anything, it might make the problems worst. If you have awful resonances in the room or nodes, a simple EQ on your speakers will only exaggerate those problems rather than fix them. If your speakers cannot produce deep-enough low-end, the software will further increase their low- end with its EQ, which will decrease their headroom and account for poorer overall performance. The solution is to do everything in your power first to address the acoustic issues of your space and get a system that is capable of producing the sound you want. Only then can you use room-correction software to polish the results.
I know several top mixing engineers in the UK, which use Reference 4 by Sonarworks. The one thing they all have in common is that all of their rooms are well-treated. Their uses of the software are very minimal, as I said – just polishing and final touches!
In Summary
To get your low-end-heavy mixes to sound good, you first need to be able to hear accurate low-end in your room. Whether your mix room is in a small flat-based bedroom or a garage, you should follow the basic principles outlined in this article.
Try to absorb as much of the low-end in your room as possible, then get a subwoofer or a capable main-monitor system to bring back what you’ve lost.
Buy or build deep-enough bass traps that will cover most of the areas you’re targeting. You can not compromise on depth and still expect decent results. Don’t rely on room-correction software to do all the heavy lifting. Reply on heavy bass traps and their depth!
And finally – use your ears. Regardless of what the science, the forums, or the “experts” say, trust your ears and experiment. Move things around until you’re happy, and don’t just settle down.


